Add Disk or Folder Dialog
In this dialog, you select a drive, a folder or a network share to add to the catalog. The dialog has three tabs: Drive, Folders and Network.
How to open the dialog
- On the Main tab of the ribbon, in the Adding group, click Disk or Folder. The dialog opens on the tab that you used last.
- Click the arrow on Disk or Folder and select Disk…, Folder… or Network Share…. The dialog opens on the related tab.
- On the Adding tab of the ribbon, click Disk, Folder or Network Share.
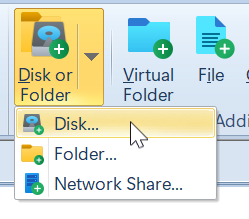
You can assign keyboard shortcuts to these commands in Options > Keyboard (group Add Commands).
The dialog
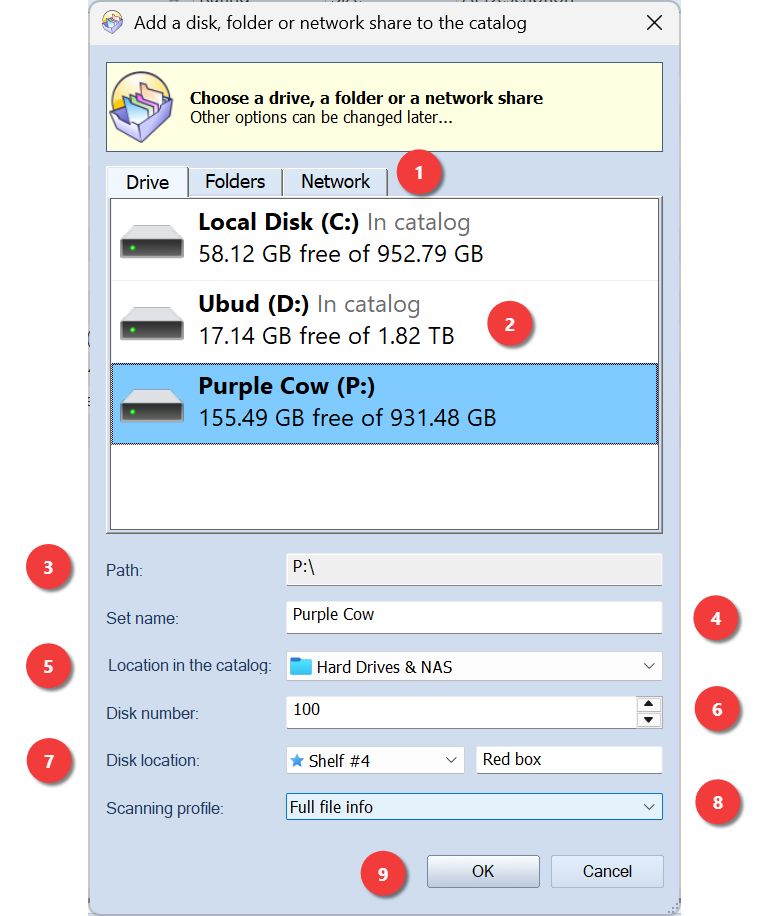
1. Tabs
| Tab | What you add |
|---|---|
| Drive | A drive of this computer: a hard disk, a USB drive, a memory card, an optical disc or a mapped network drive. |
| Folders | A folder on a drive of this computer or on a network share. See Folders tab. |
| Network | A shared folder on a NAS or on another computer. See Network tab. |
To go to the next tab, press Ctrl+Tab. To go to the previous tab, press Ctrl+Shift+Tab.
2. List of drives
Click the drive that you want to add. Each drive shows its free space and its total size.
If a drive is already in the catalog, the gray note In catalog shows
after its name. In the screenshot above, Local Disk (C:) and Local Disk (D:)
are in the catalog, and Purple Cow (P:) is not. Use this note to find the
disks that you did not add yet.
WinCatalog does not use the drive letter to find the drive. It uses the serial number, the label and the path. If Windows gave the drive a different letter, the note still shows.
3. Path
The path of the selected drive, folder or share. On the Drive tab, you cannot change this field. On the Folders and Network tabs, you can type a path. See Typing a path below.
4. Set name
The name of the new item in the catalog. You can change it later.
5. Location in the catalog
The catalog folder in which WinCatalog puts the new item.
6. Disk number
A unique number for each disk. WinCatalog increases this number by one for each new disk. If you write the same number on the DVD or on the USB drive, you can find the disk quickly on the shelf.
7. Disk location
Where you keep the disk. In the list on the left, select the general location, for example a box, a shelf or a disc wallet. Many disks can have the same general location. In the field on the right, type the exact place in it, for example the page of the disc wallet.
8. Scanning profile
The scanning profile that WinCatalog uses for this disk or folder. WinCatalog remembers the profile and uses it again each time you update the item. See Scanning Options.
9. OK and Cancel
Click OK to add the item and start the scan. Click Cancel to close the dialog and add nothing.
You can make the dialog larger. WinCatalog remembers its size and position.
Folders tab
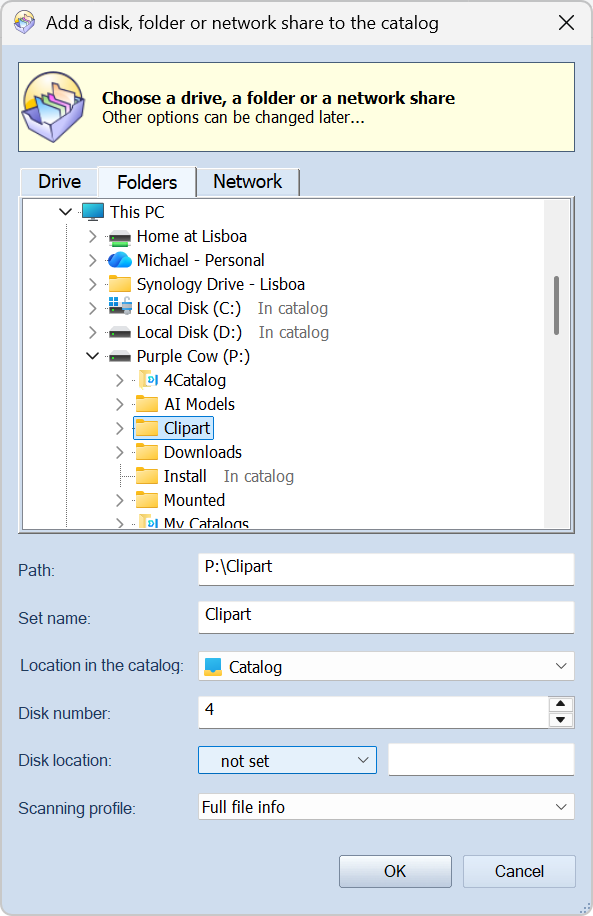
The tree shows only the places that WinCatalog can scan: drives, your user folders (Desktop, Documents and others) and OneDrive. It does not show Network, Libraries, Control Panel, Recycle Bin, Home, Gallery and phones that are connected over MTP. To add a network share, type its path or use the Network tab.
If a drive or a folder is already in the catalog, the gray note In catalog
shows after its name. In the screenshot above, two local disks, and the folder Install on drive P: are in the catalog.
The note shows only on the drive or the folder that you added. It does not
show on the folders in it, and it does not show on the drive that contains it.
In the screenshot, Install has the note, but Purple Cow (P:) does not.
Typing a path
You can type a path in the Path field, for example D:\Photos or
\\server\share\Photos. While you type, a list of suggestions opens under
the field:
| You type | The list shows |
|---|---|
D:\ |
the folders on drive D: |
\\ |
servers you used before, servers you are connected to, and servers already in the catalog |
\\server\ |
the shares of that server |
\\server\share\ |
the folders in that share |
Use these keys in the list:
| Key | Action |
|---|---|
| Up, Down | Select a suggestion. When the field is empty, Down shows the servers that you know. |
| Enter | Accept the suggestion. |
| Tab | Accept the suggestion and show the next level (the folders in the selected folder). |
| Esc | Close the list. |
Network tab
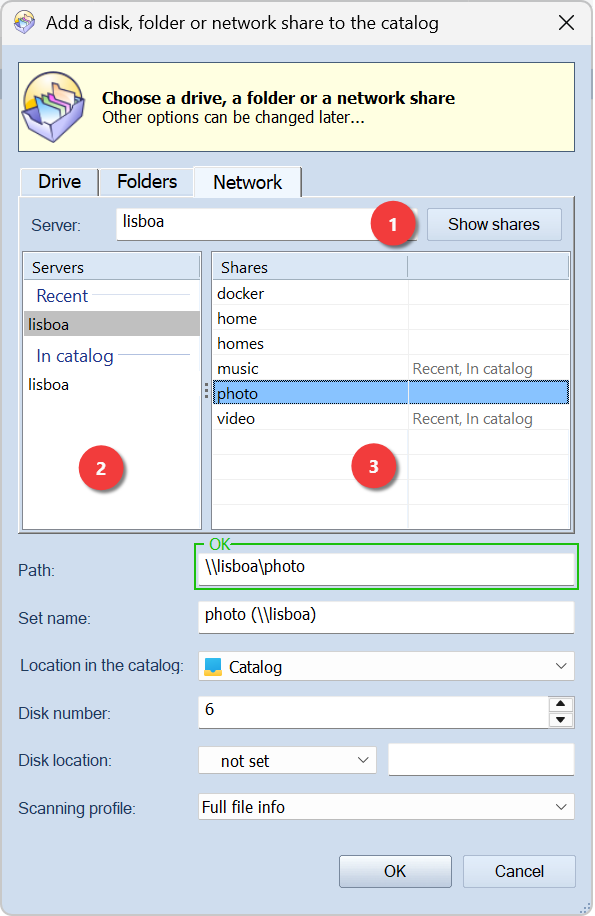
Use this tab to add a shared folder on a NAS or on another computer. The
network path has the form \\server\share, for example \\lisboa\home, where
lisboa is the server and home is the share.
1. Server and Show shares
WinCatalog does not search the network for servers. If your NAS is not in the Servers list, type its name or its IP address in Server: and click Show shares.
In the Path field of this tab, you can type a server name without \\:
WinCatalog reads lisboa as \\lisboa.
2. Servers
| Group | Servers in the group |
|---|---|
| Recent | The last 10 network paths that you added to the catalog. |
| Connected | The network connections that Windows knows, for example mapped drives. A connection that Windows remembers, but that is not open now, shows Not connected. |
| In catalog | The servers of the network shares that are already in this catalog. |
3. Shares
The shares of the selected server. The shares that WinCatalog already knows show immediately. The full list from the server comes a moment later.
The column on the right tells you where WinCatalog knows a share from:
Recent (you added it before) or In catalog (it is in this catalog).
In the screenshot above, music and video are in the catalog, and photo
is not.
Click a share to put its path in the Path field. Then set the other options and click OK.
A server name alone (\\lisboa) is not sufficient. The path must include a share.
4. Connect as…

Some shares need a user name and a password. After an error about access or about the password, the tab shows a message with the Connect as… button.
- Click Connect as….
- In the Windows credentials window, type the user name and the password for the NAS.
- To keep the password, select Remember my credentials. Windows keeps it in the Credential Manager, and you do not have to type it again.
- Click OK.
WinCatalog connects to the share and checks the path again. The dialog does not stop while it connects. The message shows Connecting to …. If the connection fails, the message shows why, and you can try again.
Already connected as another user
Windows lets you connect to one server with one user name only. If Windows is already connected to the server with a different user name, you get the message Already connected to this server as another user. WinCatalog does not close the other connection for you.
To close it, open a command prompt and type:
net use \\server\share /deleteThen try again in WinCatalog.
What the frame around the path tells you
WinCatalog checks a network path in the background. The dialog does not stop while the check runs. The frame around the Path field shows the result:
| Frame | Message | What to do |
|---|---|---|
| Gray | Checking the network path… | Wait. A NAS that is in sleep mode can need some seconds to start. |
| Green | OK | Click OK. |
| Yellow | The network server cannot be reached | Make sure that the server is on and connected to the network. Make sure that the name is correct. |
| Yellow | The network share was not found | The server is available, but it has no share with this name. Select the share from the Shares list. |
| Yellow | Access to the network path is denied | Use Connect as…. |
| Yellow | Wrong user name or password | Use Connect as… with the correct user name and password. |
| Yellow | Already connected to this server as another user | See Already connected as another user. |
| Red | The specified path was not found | The share is available, but the folder is not in it. Correct the path. |
| Red | Enter a path to a share, like \\server\share | Add the share name to the path. |
With a yellow frame, the OK button stays available, because sometimes the scanner can open the share although the check failed. With a red frame, you must correct the path before you can click OK.
Scanning and updating a network share
WinCatalog scans a network share like a local folder. To update it later, the server must be on, and the share must be available with the same path.