WinCatalog provides an ability to delete real files and folders from disks.
DISCLAIMER
PLEASE BE CAREFUL, this is the very dangerous feature, use it on your own risk and responsibility. We implemented TWO confirmation messages before you delete your files, but, once again, please be careful and review what you're intending to delete before processing the Queue in order not to lose something important.
General information
When you remove entries from the catalog, WinCatalog provides the optional ability to delete real files from the disks.
The files you delete may be located in various disks and some of them may not be connected to your computer at the moment, that is why the deletion process consists of two steps.
On the first step, you just mark files for deletion and add them to the File Operation Queue to delete them later.
On the second step - you explicitly click the Start button in the File Operation Queue and WinCatalog performs the real file operations - moving to the Recycle Bin, or deleting permanently: depending on your preferences - asking you to connect missing disks.
How to delete real files from WinCatalog
Step 1
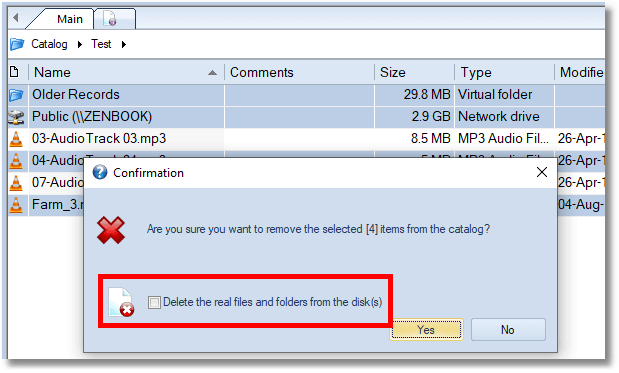
Select a file, a folder or several entries in WinCatalog. This works both for Search results (for example, after finding duplicates) and for the main grid view when you browsing your catalog file. Then hit Delete as usually.
You will see the delete confirmation prompt - exactly the same as previously, but containing one more option - "Delete the real files and folders from the disk(s)".
On this step, if you click Yes without marking the "Delete the real files and folders from the disk(s)" option, WinCatalog will just remove the selected entries from the catalog. The real files and folder will not be touched and the changes will be made in the catalog file only. This behavior wasn't changed in comparison to the previous version.
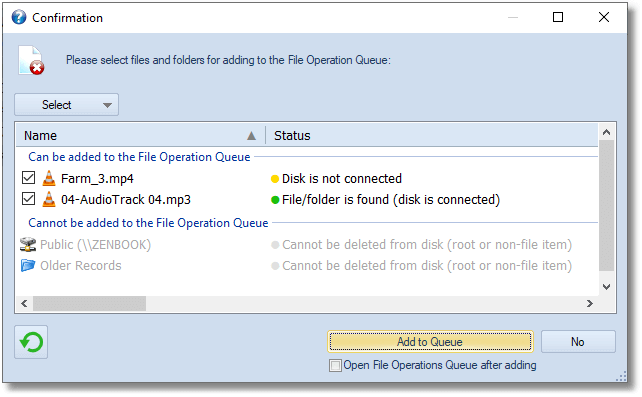
If you click "Delete the real files and folders from the disk(s)" checkbox, another window will popup where you can review the entries you selected and add them to the File Operation Queue for processing the Queue later.
On the screenshot above you can see 4 entries having 3 different statuses and only 2 of them can be added to the File Operation Queue.
In this example, the network drive and the virtual (blue) folder cannot be added to the File Operation Queue because the network drive cannot be deleted (it is the Root entry), and the virtual (blue) folder is a non-file entry, meaning that it exists in the catalog only and does not have a representation in the real file system.
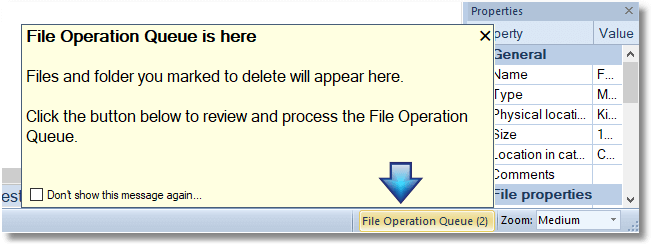
Review and mark entries you want to add to the File Operation Queue and click Add to Queue. The Confirmation windows will close. If you marked "Open File Operation Queue after adding", the File Operation Queue window will popup immediately. Otherwise, you will have to click the File Operation Queue button in the bottom right corner of the Main window to open the Queue.
The number is the brackets means the number of entries in the File Operation Queue. If the Queue is empty, no number is shown.
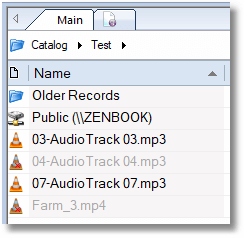
Entries added to the File Operation Queue is marked by a Cross icon and displayed in grey color until deleted or removed from the Queue.
Step 2
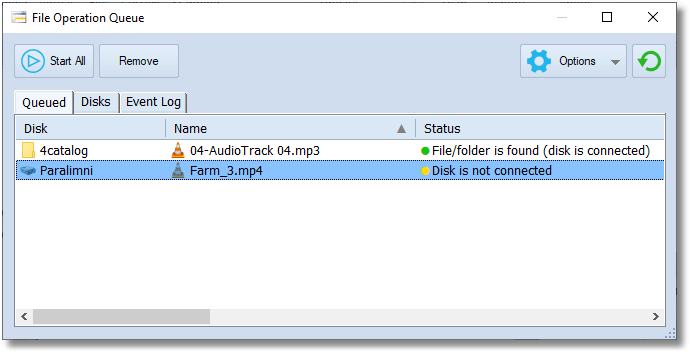
Click the File Operation Queue button in the bottom-right corner of the Main window to open File Operation Queue.
Here you can review the files and folders to be deleted, open properties of any entry or remove the selected entries from the Queue (without deletion from disk). Make a right mouse click on the selection and hit Properties to see the item properties or Remove to remove the entry from the Queue. You can also hit the Remove button to remove entries.
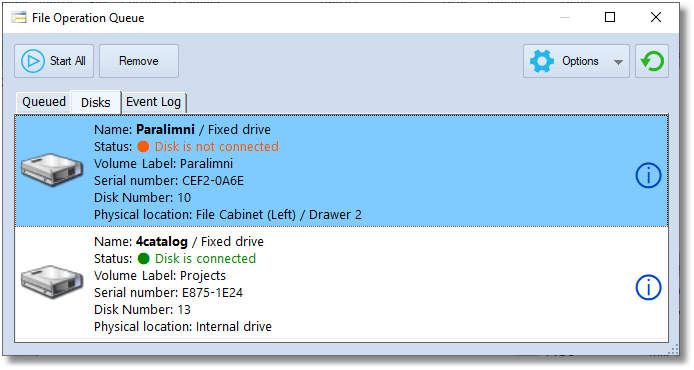
Follow to the Disks tab to see which disks are involved in the file operations planned for the File Operation Queue. Here you can see which disks you need, quickly inspect most important properties, including locations, or open the detailed properties by clicking the (I) button, or via the context menu:
Click the Options button to select if you want to move the entries to the Recycle Bin (this is the default option) or delete them permanently.
Check everything twice and click Start All when you're ready. The File Operation Queue will be processed: WinCatalog will try to process entries from the connected disks, then it will display a prompt to connect missing disks and will start over until the Queue contains any entries without errors or until you stop the processing by clicking the Cancel button in the progress window.
Entries successfully deleted from disks will also be automatically deleted from the catalog.
After the execution, you can inspect the Event Log to see which entries were deleted successfully or if any errors occurred. The Event Log is saved automatically in the catalog. Use the context menu to clear the log, copy lines to the Clipboard or save to a text file.