Actualizing (Updating) a Drive or a Folder
The contents of drives and folders change. You can add new files, delete files that you no longer need, move files from one folder to another, or simply rename files.
To reflect all the changes you made, please select the previously cataloged disk or the folder you want to actualize and click the Update button on the toolbar or in the context menu.
How WinCatalog Identifies Drives in the System
To identify drives in the system, WinCatalog uses volume serial numbers (a pseudo-unique hexadecimal number assigned to a drive during the creation of the file system during the format process) and volume labels.
Remark: volume serial numbers of hard drives usually don't change, but they may change for optical drives after burning new sessions.
Please also note that the volume serial numbers are usually based on a combination of the date and time that the drive was formatted. For some manufacturers, hard drives from the same consignment may have the same serial numbers. That is why as an additional parameter, WinCatalog uses Volume Labels (these values are usually assigned by customers based on their needs).
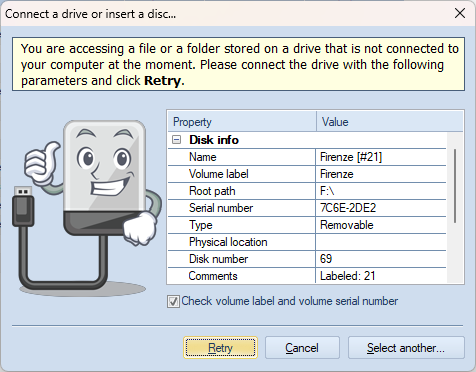
If the drive with the given Volume Serial Number and Volume Label isn't connected to your computer, WinCatalog will ask you to connect the drive:
If the Volume Serial Number or Volume Label were changed since the last scan or update sessions, in the "Connect Drive" prompt (on the screenshot above) click the Select Another button to select the drive, then unmark the "Check volume label and volume serial number" checkbox, and click the Retry button. Please be careful, when unmarking the "Ckeck volume label and volume serial number" checkbox, double check that you have selected the correct drive letter to update.
The Scanning Profile for Updating the Drive or the Folder
The update process reuses the scanning profile selected on adding the drive or the folder to the catalog. To change the scanning profile, open Properties of the drive or the folder, follow to the Volume Info tab, and switch the Scanning Profile. Click OK to apply changes.
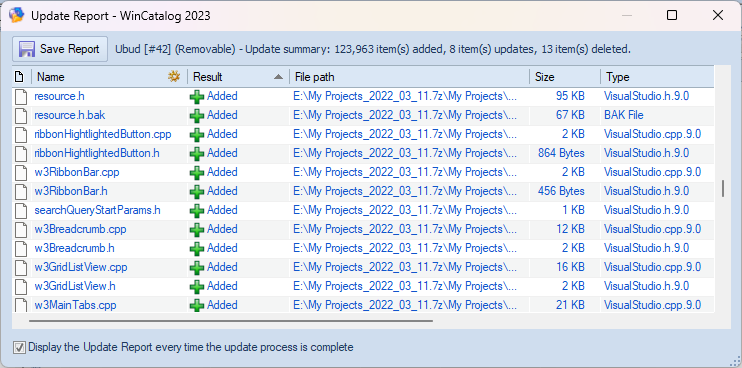
Update Report
The Update process will search for changes on the disk and update the catalog: WinCatalog will add files that have been added, it will remove deleted files from the catalog, and it will update files that have been modified since the last scan/update session.
After the process ends, you get the Update Report - the list of files and folders that were added, updated, or deleted during the session.
Skip Unmodified Files
The update process is much faster than the initial scanning process because by default WinCatalog skips files that weren't modified since the last session. This helps to speed up the updating process. This option is turned on by default for each scanning profile.
If you switch a scanning profile and update the disk, or if you change any processing options, for example, the size of picture thumbnails, or an amount of text to grab from text or PDF files, only files that were modified since the previous scan will be updated.
To update all the files you should switch this option temporarily off. Please click the Scanning Options button on the toolbar, select the scanning profile to modify (most probably, "Full file info (default)" or "My Settings), and on the General Scanning tab unmark the following option: "While updating a disk or a folder: skip unmodified files (speeds up the update process)". Make the same changes to other scanning profiles if needed. Click Save and update your disk(s).
Please do not forget to turn this option back on to speed up future updates.
Read more